Posts

Showing posts from 2011

Install LAMP-SERVER, linux, apache, mysql, php

Do you want to install LAMP-SERVER on Ubuntu Linux ? LAMP stands for Linux, Apache, Mysql, Php Its a package containing all required packages which are needed on linux for developing php application with apache server and mysql database server. You can install each of the packages individually or just install a single package containing all this in one single command. Which one you will prefer ? Don’t worry ! I will show you both the methods….  Install all packages separately Perform following commands sudo apt-get install apache2 Now one all installation is done, just make sure that it is installed and working properly. Try http://localhost/ or http://YOUR_IP_ADDRESS It will show you a message in web page “It Works!” means “It is working”. Now next step install php and required libraries & modules. sudo apt-get
Enable 3D desktop cube without crashing Unity in Ubuntu 11.04

Image
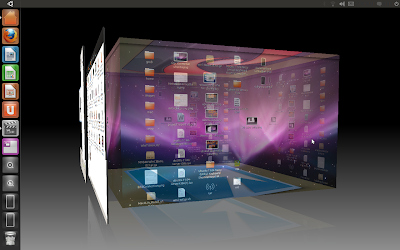
Install compiz setting manager through terminal or synaptic manager. In terminal paste the command .   sudo apt-get install compizconfig-settings-manager.     Steps: ( Note: each step must be followed sequentially and you will get the desktop cube as shown in the screenshot) 1.In compiz setting manager disable these plugin:             i) OpenGL               ii) Composite              iii) Ubuntu unity plugin            iv) Desktop wall .     Select disable plugins when a window appears asking for disabling other plugins. After disabling these plugins your panels and unity will disappear,don't panic and follow next step. 2. Now enable these plugins sequentially.          i)OpenGl        ii)Composite       iii)Desktop cube        iv)Rotate cube       v)Ubuntu unity plugin. Some conflicts may occur.Conflicts occur when same buttons are assigned to two or more actions. After all these steps you screen may response abnormally.Don't worry restart your m

How To Speed Up Your Internet Connection On Ubuntu/Debian

Image
In this tip, we are going to apply a simple modification that can help you speed up your Internet connection and optimize page load time. The modification will be made to the nsswitch.conf file and it is valid for Ubuntu, Debian Squeeze & Wheezy. Open the Terminal and run one of these commands to edit the nsswitch.conf file: sudo gedit /etc/nsswitch.conf or sudo nano /etc/nsswitch.conf Locate this line: hosts:          files mdns4_minimal [NOTFOUND=return] dns mdns4 And add just below it this line: hosts:          files dns Save now the file and close it. You will now see an improvement in your Internet connection speed, but don't expect a major improvement. Good Luck!

How To Move Your Mouse Pointer With Your Keyboard (keyPad) - Ubuntu 11.04

Image
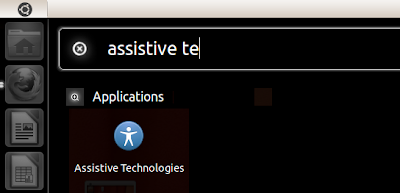
In this tutorial, we will see how to move your mouse cursor using the keyboard, and more precisely with the keypad on Ubuntu 11.04. It is recommended for Ubuntu users who have mouse functioning problems. This tutorial is also applicable on Ubuntu 10.10/10.04. Get Started 1. Using the dash search for " assistive technologies " and open it. 2. Click on Keyboard Accessibility . 3. Open the Mouse Keys tab and check on " Pointer can be controlled using the keypad ", then click Close two times to close all running windows. 4. You can now control your mouse pointer using the keypad: Press 1/2/3/4/6/7/8/9 to move your mouse pointer Press 0 to hold down the mouse left click button Press the dot (.) to simulate the mouse left click button Press the Application key to simulate the mouse right click button

Navigate your System Files and Folders in 3D - Ubuntu

Image
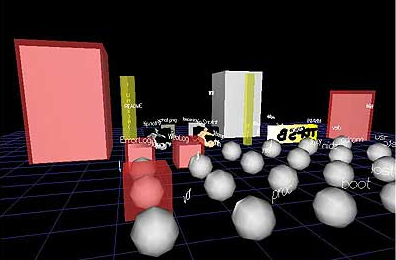
Users are used to navigate their files and folders using classic file managers. But what will be the impression if we browse and view folders and files in 3D, some users will surely be surprised, especially when you are using a Linux distribution. While searching the web, I stumbled upon a tool that is compatible with Debian-based distributions having the name tdfsb . This tool allows to browse files and folders as if we were thrown into a three-dimensional world. To be able to use this tool under Ubuntu, you have to have a graphics card supporting OpenGL in order to view 3D graphics. To install it on Ubuntu 11.10/11.04/10.10/10.04, run this command from the Terminal: sudo apt-get install tdfsb You can then run it with this command: tdfsb Here are some keyboard shortcuts that will help you browse folders and files: Arrow keys : move among files and folders u : Return to the root folder f : Switch to full-screen view Page Up and Page Down keys : Move up and d

Change the Minimize Effect (Skewer Effect) on Ubuntu 11.04

Image
Compiz has a lot of configuring options and stunning effects that you can apply on the new Unity interface. In this tutorial, we are going to see how to add a cool effect to windows when they are being minimized on Ubuntu. The minimize effect will force minimized windows to split in squares and move horizontally to the left side of the screen (towards the launcher). Here is a video showing the minimize effect: Get Started 1. First of all, you have to install Compiz with these commands from the Terminal (Ctrl+Alt+T): sudo apt-get install compizconfig-settings-manager compiz-fusion-plugins-extra Launch Compiz using the dash: 2. In the main window of Compiz, check on Animations Add-On located under The Effects section, then click it. 3. In the last option labeled " Skewer ", enter the following parameters: Skewer Direction: Left Tessellation Type: Rectangular Window Grid Width: 4 Window Grid Height: 4 Thickness of Animated Polygons: 0 R

Install Extra Screensavers for Ubuntu 10.04 Lucid Lynx

Image
As you may already know, Ubuntu has screensavers that are installed with every new installation. But few people actually know that you can enable a lot more screensavers in Ubuntu easily. This tutorial will show you how to enable more screensavers Getting started: To get started, go to Applications –> Ubuntu Software Center. Then search for and install xscreensaver-data-extra: xscreensaver-data-extra After installing, go to System –> Preferences –> Screensaver. You’ll notice a lot more screensavers are now available

Test Firefox 6 Nightly 1 (6.0a1) in Ubuntu

Image
As promised by the Firefox developers are on steroids developing Firefox at super speed. Firefox 6.0 Nightly is now available following the release of Firefox 5.0 aurora which was released a week ago. There not much to say in this release. You can also check their daily builds @  http://nightly.mozilla.org/ Download Mozilla Firefox 6.0 Nightly for Linux Firefox 5.0 Nightly 1 Linux i386 Firefox 5.0 Nightly 1 Linux amd64 Test it Out! Extract the firefox-6.0b1.tar.bz2 Open the folder in the terminal (or) Press F7 in the folder to open embedded terminal Type  ./firefox to test Firefox

5 Fastest Linux Download Manager/Accelerator Program

Image
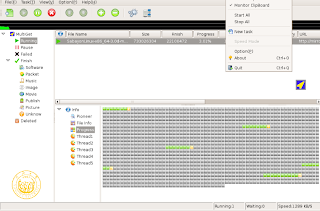
Some people ask 'how can i use program such us Internet Download Manager (IDM) in Linux ?'. Yes !!!, to get a file or download in internet is an absolute activity now days, by download manager/accelerator having download is more easy and fast, Here the 5 Recommended Linux Download Manager/Accelerator Program widely use in linux. Multiget   MultiGet is an easy-to-use GUI file downloader for Windows/Linux/BSDs/MacOs.  It's programmed in C++ and has a GUI based on wxWidgets. It supports HTTP/FTP protocols which covers the requirements of most users. It supports multi-task with multi-thread on multi- server . It supports resuming downloads if the Web server supports it, and if you like, you can reconfig the thread number without stopping the current task. It's also support SOCKS 4,4a,5 proxy, ftp proxy, http proxy. ( http://multiget.sourceforge.net/ ). Folow this link to download Multiget.                                            Axel In the previous version

How to Install GIMP in Ubuntu 11.04 Natty Narwhal

Image
GIMP (short for GNU Image Manipulation Software) is a free raster graphics editor software. From retouching to free hand drawing, GIMP can accomplish almost any essential image editing task complete with filters and plugins, serving to be viable replacement for Photoshop in Ubuntu. Here is our guide for Gimp installation in Ubuntu 11.04 Natty. The current stable version is 2.6.11 and the beta version 2.7.2 is also available for those who want to get their hands dirty. Installation To install GIMP in Ubuntu 11.04, open Terminal and execute the following: sudo add-apt-repository ppa:matthaeus123/mrw-gimp-svn sudo apt-get update sudo apt-get install gimp gimp-data gimp-plugin-registry gimp-data-extras In case you get this error gimp-2.7: error while loading shared libraries: libgegl-0.1.so.0: cannot open shared object file: No such file or directory Open Terminal and execute : sudo apt-get install libgegl-0.0-0

How To Upgrade Ubuntu 10.04 (Lucid Lynx) To 10.10 (Maverick Meerkat) (Desktop & Server)

Image
1 Desktop Start the Update Manager ( System > Administration > Update Manager ): (JavaScript must be enabled in your browser to view the large image as an image overlay.) In the Update Manager , click on the Settings... button (in the lower left corner): (JavaScript must be enabled in your browser to view the large image as an image overlay.) The Updates tab in the Software Sources window should open. Select Normal releases in the Show new distribution releases: drop-down menu and click on Close : (JavaScript must be enabled in your browser to view the large image as an image overlay.) Back in the Update Manager , click on the Check button to check for new updates and distribution releases: (JavaScript must be enabled in your browser to view the large image as an image overlay.) The Update Manager should show that a new distribution release ( 10.10 ) is available. Click on the Upgrade button to start the distribution upgrade: (JavaScript must be enab

Upgrade to Ubuntu 11.04 using Live CD

Image
This method doesn’t require a internet connection. What you need is only a Ubuntu 11.04 Natty Narwhal CD. In case if you don’t have the CD you can very well create a bootable USB drive using the built-in Ubuntu Startup Disk Creator or using Unetbootin.   Now boot into the Live CD or pen drive. Choose upgrade Ubuntu 10.10 to Ubuntu 11.04. Enter your username and password (what you have for Ubuntu 10.10) when prompted. That’s it.

mint-sunrise plymouth splash screen

Download the mint-sunrise plymouth splash screen from this link http://linuxmint-art.org/content/show.php/mint-sunrise+plymouth+splash+screen?content=141215 INSTALLATION: -Copy mint-sunrise folder to /lib/plymouth/themes -copy/paste the file 'splash' into /etc/initramfs-tools/conf.d (Optional, for better buffer) - Type to terminal: sudo update-alternatives --install /lib/plymouth/themes/default.plymouth default.plymouth /lib/plymouth/themes/mint-sunrise/mint-sunrise.plymouth 200 sudo update-alternatives --config default.plymouth - Choose the number to \'ubuntu-sunrise\' in the options that pop up sudo update-initramfs -u

Decorate Grub 2 boot loader using BURG

Image
BURG is a program based-on Grub 2,BURG uses new menu list,screen layout and shortcut keys that all easily customized.Following is tested in Ubuntu Karmic. Update: Burg has released a first version front-end GUI called Burg-Manager. Read more 1.Install BURG Edit source.list file(Open terminal from Applications/Accessories/Terminal): sudo gedit /etc/apt/sources.list   add following into the file and save it. deb http://ppa.launchpad.net/bean123ch/burg/ubuntu karmic main deb-src http://ppa.launchpad.net/bean123ch/burg/ubuntu karmic main Add GPG key: gpg --keyserver subkeys.pgp.net --recv 55708F1EE06803C5 gpg --export --armor 55708F1EE06803C5 | sudo apt-key add -   update and install: sudo apt-get update sudo apt-get install grub-pc   Then,write the new startup code into MBR: sudo grub-install "(hd0)"   2 .Download themes: wget http://grub4dos.sourceforge.net/themes.tar.bz2   Extract it to /boot/grub/themes: sudo tar -xjf themes.tar.bz2 -C /boot/grub/themes

How to install Ubuntu Tweak 0.5.6 beta in ubuntu 10.04/9.10

Image
Ubuntu Tweak is an application to config Ubuntu easier for everyone.It provides many useful desktop and system options that the default desktop environment doesn’t provide.With its help, you will enjoy with the experience of Ubuntu! Note:- This is still in beta version What is new in ubuntu tweak 0.5.6 beta As the user request, the next version of Ubuntu Tweak will add a new feature, it is called: Reset Setting. You may don’t like the effect after tweaking some options, how can you go back? Ubuntu Tweak will help you go back easily! After every resettable option, there will be an reset button. The tooltip will tell you what is the default value, and you can reset the value by just one click. Install Ubuntu Tweak 0.5.6 beta in ubuntu 10.04/9.10 Open the terminal and run the following commands sudo add-apt-repository ppa:ubuntu-tweak-testing/ppa sudo apt-get update sudo apt-get install ubuntu-tweak Desktop reset option screenshot

how to install VLC Media Player on Ubuntu 11.04

Image
There are lot of Music players available for Ubuntu 11.04 (Natty Narwhal) but VLC is the most popular media player, not only for Ubuntu 11.04 or Linux Distros but also on Windows (7, Xp or Vsita) and Mac OS X. VLC is a free and open source multimedia player. it’s available for all common platforms. it has been developed/maintained under VideoLAN project. VLC is known as all in one media player, because it can play all the common media file formats – like mp3,avi,flv etc. Actually VLC is capable of handling a lot of input and output file formats. Ubuntu 11.04 has banshee media player as a default media player, which is a nice one but not suitable for all cases. VLC can be installed in multiple ways – e.g from Command Line, Ubuntu Software Center or from Synaptic Package Manager. Here we will cover any two methods. After installing you may need to install some proprietary libraries and codecs e.g libdvdcss2 for playing music/movies DVD (Encrypted using CSS (Content Scra

How to install Ubuntu Desktop Edition

Image
This is tutorial number 1 in the series of Linux tutorials for Windows users : How to install Ubuntu Desktop Edition . Even if the process itself is pretty simple (there are only some clicks to be made and a form to complete), there are some things that need to be made clear for the new user and, of course, there are some useful tips. Let’s proceed. The first step is getting your brand new Linux ( Ubuntu ) .iso image that you will burn on a CD that we are gonna use for the install process. To do that, just go to http://www.ubuntu.com/getubuntu/download . Here you will have several download options. For the purpose of this tutorial, choose the Desktop Edition tab, click the radio button for Ubuntu 9.04 Desktop (the latest version) and then choose the architecture that fits your machine. Throughout this tutorial I will use the 32bit version, but that mustn’t stop you from choosing the 64bit version if your machine is able to cope with that. Choose the nearest mirror a